Thursday, 23 December 2010

The Transmutation of the Relief

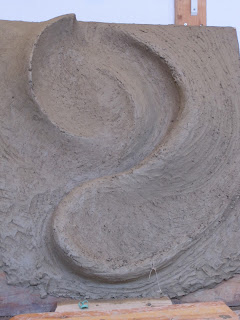
The 'wave' relief has undergone many changes since my last post about it back in October: from a turbulent breaking wave, a maelstrom of tide and currents, to an all together more settled and more 'artificial' composition, in the sense of it being 'made by or resulting from art or artifice' (OED), it being more 'contrived', more abstract as opposed to tending towards the representational/naturalistic.

This, like all the previous images of this relief, is in an intermediary stage:


Having explored the 'feel' of the swell, I've taken a step away from the 'wave' concept and am developing a composition that is still inspired by the element of water but is less closely evocative of a turbulent sea.
This came about as I began to think about what I would do with the clay form once I felt I had come to the end of my exploration of the relief for the moment. The size of this relief - about 1m square - makes it totally unmanageable in clay: it's far too heavy. Casting it in jesmonite seemed the answer - jesmonite is light-weight and strong - but I didn't want to do a simple cast from a silicon rubber mould because I didn't want it to be an ordinary relief, i.e. a 3D composition hung on the wall. I then had the idea of coating it with marble jesmonite (with a layer of quadaxial fabric to give it added strength) which would give me a true negative cast and a positive side that would need some reworking. This means the relief is viewed from both sides, back and front, positive and negative, and needs to be presented as a free-standing object.
I then set about making a couple of maquettes to try out my theory - the first measures about 30 cm and the second 50 cm.
Here are the clay forms:


And here are the jesmonite coated:


The next step is to remove the clay from the negative side and clean it up and rework/refine the postive side.

The maquettes should give me a better idea of a) how that negative space works, i.e. which shapes work and which don't work in the negative, so I can transpose that to the composition of the large relief; and b) whether the jesmonite is strong enough for this kind of method and looks good enough once rasped and sanded.
Now I just need to wait for the clay to dry out so it comes away cleanly from the jesmonite ...
Thursday, 9 December 2010

Simplicity Through Complexity - Continued

Simplicity through complexity. It is in fact my middle son who first used this phrase, in relation to the second vertical form in the Metamorphosis Seminar series - Stage 8 - as I was frantically removing two horizontal elements in the form that made the whole thing far too complicated and ultimately distracted from what I felt the form was about (cf. post entitled 'Stage 8 in the Metamorphosis Seminar').
I love that phrase; I love the words and I love the concept. No surprises there.

It reminds me of another statement I saw on the dust extractor at a studio space at Fondazione Sem in Pietrasanta. It was the workspace of a sculptor called Armen Agop - http://www.armenagop.com/ (do take a look at this website), a fascinating character, both as an artist and as a person, whose work I admire greatly.

He had written this first in Arabic, followed by the English translation:


This was a highly inspirational encounter, both because of him and the surroundings in which he worked and because of this statement. I have had discussions with artists, who feel that simplicity equals boring; they need more going on in a sculpture (painting, ...) to keep their interest. I wonder whether they might be missing the point ...


Here are a couple more images:


Two other sculptors I discovered whilst in Pietrasanta two years ago: one is the Japanese artist Kan Yasuda:
http://www.kan-yasuda.co.jp/
the other the French sculptor Nicolas Bertoux:
http://www.nicolasbertoux.it/

More on them in another post.

Thursday, 2 December 2010

Two Further Explorations in the Metamorphosis - Simplicity Through Complexity

The next - and for the time being the final - stage in the Seminar is this:


This is a truly fascinating form. The concept is very simple: if you run a ruler from one side of the square to the opposite side closely along/touching the top surface of the form, the line immediately beneath the ruler should be completely straight, i.e. there should be no dips or bulges in the clay surface - of course you're holding the ruler at the same angle as the gradient of the clay form. Using the fourth image (the one immediately above) for this explanation, with the ruler placed on the edge of the near side, the left side of the ruler being lower than the right side as it sits on the clay form, as the ruler moves across to the far side it gradually changes angle and the left side rises up to be higher than the right - a beautiful movement to watch through the air.
The tiny line that runs across the very centre of the square should be the only level horizontal line in the entire form. The tipping point is minute, invisible to the naked eye.
This form took me hours to create, simply because it requires very meticulous adding and taking away of tiny amounts of clay to achieve lines that don't dip or bulge anywhere.
I love the simplicity, the serenity of this form; it sits there quietly, but there is a huge amount going on;
simplicity through complexity. It also has that 'universal' element I've referred to previously, the almost mathematical dimension.


I've then taken this a step further - this was not part of the Seminar as such, just a personal exploration. How would this work if, instead of one plane moving at a pivoting slant as above, you have three? If you have two, top and bottom - which was in fact the proposed next stage in the Seminar - you would need to make the difference in level between the high and the low at the edge of the square slant at a very steep gradient to make for an interesting form - otherwise you get something like a slightly bent-out-of-shape tile - and you would have to go against the fundamental principle of the line immediately beneath the ruler being completely straight, i.e. no dips or bulges in the clay surface, otherwise you would end up with a very cumbersome, heavy form (but very elegant if you allow the sweep down through the dip in the middle to go deep).
I wondered whether three sides might lead to an interesting form. As you can see below, it achieves an interesting twist ... and you can enjoy the stretch of the moving plane three times over!


This form needs some more work to refine it further, but I wanted to include these images as I feel they complete the process. Not a form I would simply want to 'scale-up', i.e. take this as a true maquette, but certainly a concept that is important to have in one's repertoire of sculptural language, as elements of it will emerge in future pieces.

SIMPLICITY THROUGH COMPLEXITY.